Monday, July 23, 2012

Favorite Things

So I haven't blogged in a while and it's really time to get back to it. I've been pretty busy raising a two year old, starting a new job, nursing my two ankles from a fall and of course crafting. In the midst of my daily life I don't really get much chance to go out and do things so when a friend from church organized a favorite things party I couldn't wait. I forgot to take a picture of my favorite thing I brought to the party but what is more important is what I brought home!
 
We  had a great time talking, snacking and enjoying kid free time which is worth  a lot. The concept is pretty simple; bring five of one of your favorite things and place your name on a slip of paper five times and you pick out five slips of paper with different names on them.

 Relaxation...face mask, scented candle and chai tea

Burt's Bees Lip balm and Butterfinger Bar
Toothbrush and toothpaste is probably something you wouldn't think of right away but for someone that was told to stop brushing so much by her dentist it's pretty high on the list. Plus it's always nice to have spare toothbrushes for when you travel .
This is two items, organizational items(lists, notepads, pens) great for someone who has three calendars and a basket from target that is goes great with one of my end tables. A few other favorite things were, three variety of mints, peanut butter m&m's and Burt's Bees mango, more organizational supplies, shower lotion, and a mini ESV Bible.
           I recommend a favorite things party, food friends and good conversation you just can't go wrong.

Thursday, December 8, 2011

A homemade Christmas

My own Owie Owl

It's that time of year again. I love Christmas, just not the gifts but being with family and celebrating the most important holiday of the year. Browsing Pinterest I saw a cute owl rice warmer, and since my sister in law loves owls I thought I would make her one but I knew her husband would still steal hers so I decided to make one for him. They are really easy to make you just make a pattern choose your fabric, sew and fill. The hardest part was sewing the eyes and the beak on. For my brother in law I made a skull warming pack and used my cricut to cut the skull pattern.
https://blogger.googleusercontent.com/img/b/R29vZ2xl/AVvXsEgnPhIpaxBS4X5P-cmpLV862ABx07hA51iDu1GXff0PCNTqWoHNeGdF8GYCXpHhByDy-K09Eow0abt4QH0LMUh93E5tsx2tfo6RDIZPscxZLI5fu4PtoB3jWvRiIUUT_sSY9OHWDGrt7RBc/s1600/060+copy.png


Thursday, September 1, 2011

Height Chart

 I was given a height chart for my son by a great grandparent. The only problem was that is was plain and had car shapes on it, which doesn't match his room. I took the shapes off and filled in the cracks with wood filler and sanded it down. Then I spray painted it with a satin beige color. After a few coats and letting it dry I just added animal shapes and painted chip board letters dark brown and marked the height measurements. I also finally got to use the circle cutter I bought a few weeks ago. You just slide the pictures in the back and you have a picture height chart.

Saturday, August 13, 2011

Waiting for fed ex

My new camera is finally on the way!!! I've had to use my old ones, they work but only when they feel like it and never when I need to use them. I did a lot of review searching and I settled on a Canon Powershot A2200. I was going to get the 1200 model but it wasn't going to be able to be shipped for 1-4 months and I can't be without a decent camera for that long. It got good reviews for a point and shoot camera, it also has several features that sounded cool.

In other news I finally got a magazine from my subscription to Scrapbooks etc. I haven't got a magazine since January so I contacted them and two weeks later I have a magazine and extended subscription. Their website is pretty cool, check it out here.

Wednesday, August 10, 2011

Nap craft

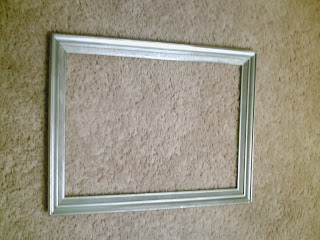
I have to thank Pinterest for my next project(I spent way too much time gathering ideas). I needed something to hang at the bottom of my stairs and something that was cheap and easy to make. I picked up a frame at a thrift shop I pass everyday on my way to work for $1.49! I just sanded it lightly and spray painted it silver. If I can ever convince myself to spend $35 on just one roll of wall paper to put in frames, then I will have a nicely decorated living room. After the paint dried I sanded it  again just so some parts weren't so shiny. That was all accomplished while my little one took a nap, once he woke up the frame went in the closet to be finished when he went to bed. 
Before sanding and spray paint

Ready for twigs
I left my natural and didn't spray paint them. I think it looks more earthy that way. I flipped the frame over and laid out where I wanted to the twigs to go and just used hot glue to  keep them in place. I also used the hot glue to put the picture hangers on the back, mainly because I couldn't find the nails that went with them. The last thing to do was to hang it on the wall and I actually hammer it while T was sleeping; not a peep from him. 
I love how it turned out I just wish it was bigger! I think I still need something else at the bottom of the stairs, I was thinking along the lines of framed leaves or something like that. The project can be found at Cleverly Inspired

Saturday, July 30, 2011

Craft Closet

I think no crafting blog is complete without a tour of where the creativity takes place, unfortunately for me I dont have a room devoted to my crafting supplys where I have a nice big desk with a big window for lots of light:( I do however have a nice craft closet that houses all my stuff and its all on wheels so I can pull it out to the kitchen table when I want to do my projects. Its all mostly organized so sometimes I just go get what I want and don't have to drag everything out.
The first picture is the shelve in the closet that houses my albums, and cricut mats and my drill. I keep all my cartridges on the shelve because I have a Gypsy and they are loaded on there. I keep the ones that cant't be loaded on the cart with the cricut so I don't have to go looking for them in the giant stack.


The next picture is of my carts. From the left is a cart I found at Kmart, It hold the cricut nicely and can hold up to 100lbs I think which makes it move smoothly. It also Holds my cards, Stacks of paper and on the bottom rack it where I keep things I dont use that often. The colorful cart  is where I keep all my loose scrapbooking paper. The cart is from Joann's and I got it from my brother. He actuall sent it in the mail since they were going on clerance. I have an awesome brother and sister in law :)
The next cart has my stickers, markers, ribbons, glue, tape, pens, rub ons, and embellishments. Well that's pretty much the tour but now you know where and how I keep everything.


Friday, July 29, 2011

Wedding Season

Tomorrow I am going to a wedding of a family friend; she actually caught the bouquet at my wedding. Anyways I wasn't sure what to get her even though I looked at their registries I felt that a coffee maker or mixing bowl set was not really special, practical maybe but not creative. I actually thought about taking the easy way out and getting a gift card but I really hate doing that, I don't think they are personal enough. I decided to do some glass etching. I received this for a wedding gift and used it often until me or the hubbs broke one. I had every thing I needed except the glasses and a bonus plate which I did not have, but with a quick trip the dollar store I had everything I needed.

Supplies needed
  • Glass for etching
  • etching cream( I used armour etch)
  • vinyl
  • Cricut/Gypsy(or precut stencils that come in a kit)
  • water
  • gloves
  • Paintbrush or Q-tip for applying

Step 1 was to clean the plates because they had some kind of grime from China on them. You need to clean the glass before you apply the etching cream so you have a clean work surface.Below is a picture of the plate and glasses after being washed and waiting to become beautiful.
Step 2 is to decide where and what you want your image to be so you can size it appropriately.
Step 3 is creating your  image. I have that part easy because I have a Cricut and a Gypsy. The gypsy makes creating the image so easy but if you don't have one there are kits out there, I've also seen videos on youtube on making your own image with wax.
Tips: I applied the etching to the back of the plate so if you use words you must mirror the image.
Using the Gypsy I layed out the letters the way I wanted and  used a circle around them so when it was cut I would have the negative image for the letters.

The glasses and plate ready for a coat of armour etch

After you have applied your image to the glass you are ready to put the etching cream on. *WEAR GLOVES*  You do not want to get this stuff on your hands.
Apply a GENEROUS coat of etching cream, you need to to apply an even thick coat.
Wait at least 10 minutes, that the amount of time I waited and I think it could have sit a few minutes longer

After the time is up put your gloves back on(I'm assuming you wouldn't leave them on for the full time) and take it to a sink so the etching cream can be washed off. I used my kitchen sprayer to get most of it off but some it was stubborn so you can rub the rest of it off with your fingers. The the glass air dry and you have yourself a glass etching. It seems hard but its really not, I will be doing it again:)


The finished product, minus the glasses. Did you spot something funny??? Well I didn't but my mother in law did, it seems I put the wrong wedding date on the plate:( After all that hard work, well at least they have the glasses and I will be getting them a nice bottle of sparkling cider to go with their new glasses

Friday, July 22, 2011

Trash to Treasure

It's amazing the things you can find setting out at the road waiting to be collected. I found this bistro set last October and thought it would be a great project for the spring. It was several years old, had some rust issues and was just asking to be spruced up. The seats need to be replaced because the were rotting through, for me that was the hardest part. The frames and table needed a fresh coat of spray paint and they were almost as good as new. As for the cushions they needed a new base, new foam and new fabric. Thanks to my father in law being somewhat of a pack rat all I had to buy was the foam, fabric and an additional can of spray paint, total cost was $21.

The finished project with the new patio I put down. I love to have a place to watch my son play or have breakfast on a nice day and  most of all I love that for only $21 and a little elbow grease I can something that was once trash turned into something beautiful